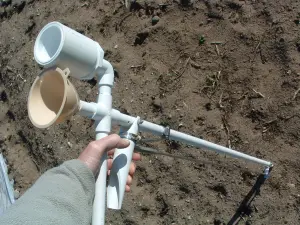
My Seed Planter
I was able to cobble together a hand held seeder out of PVC pipe and a few other pieces of hardware. I’m expecting that it will work for medium to large-sized seeds like beans, corn, peas, pumpkins, squash, and, most importantly for me, sunflowers.
Here’s how it went.
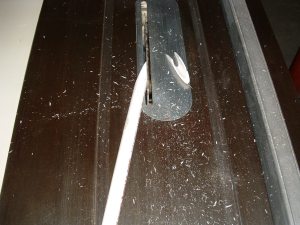
Cutting the Bottom
With a table saw, I shaped one end of a 1/2 inch PVC pipe to a V-shaped point. I’ll call this the downpipe and its length will depend on how tall you are. I was shooting for it to end up a little above waist level, and I’m fairly tall, so mine ended up being 41 inches long.
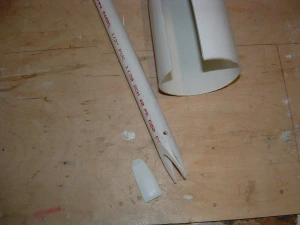
The small piece was part of the big pipe.
Out of a piece of 4 inch PVC pipe I shaped a strip to close off one side of the V-point at the bottom. I used PVC cement to attach it, and I’m thinking that it may be the weakest link in the machine. Time will tell if it will withstand repeated jabs into the soil.
Edit 9/1/16: The glued-on strip is still there doing fine.
To close off the other side of the V and, more importantly, to open and let a seed drop out, I fashioned a flipper out of a piece of steel. Getting a useful piece of steel is probably the hardest part of the project. You want to be able to bend it, but not so easily that it will come unbent halfway down a new row of corn. It helps if you’re a bit of a pack rat and collect odd materials for future use, but hardware stores will probably have something you can use. Using a jig saw is an easy way cut the steel, but a hack saw is fine too.
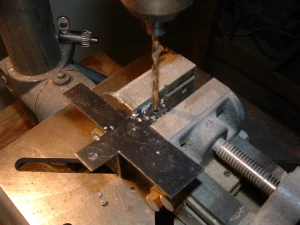
Flipper Cut Out Being Drilled
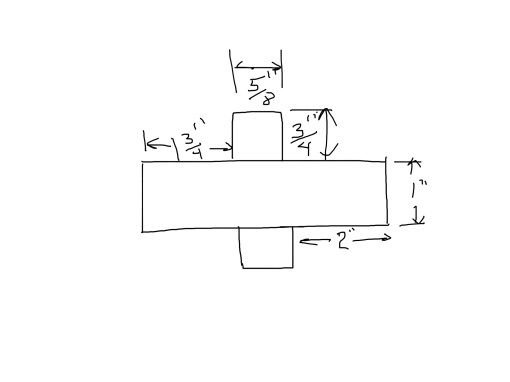
The flipper starts out being cross-shaped. The side arms are drilled for a pivot bolt and then bent down to wrap down over the pipe. The top arm is then bent up to make a lever to attach a pull rod. This rod will pull the flipper open to drop out the seed.
Some shiny paint has been added and you can see how the flipper fits on the bottom and attaches to the pull rod.
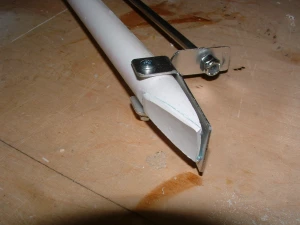
The business end of the planter
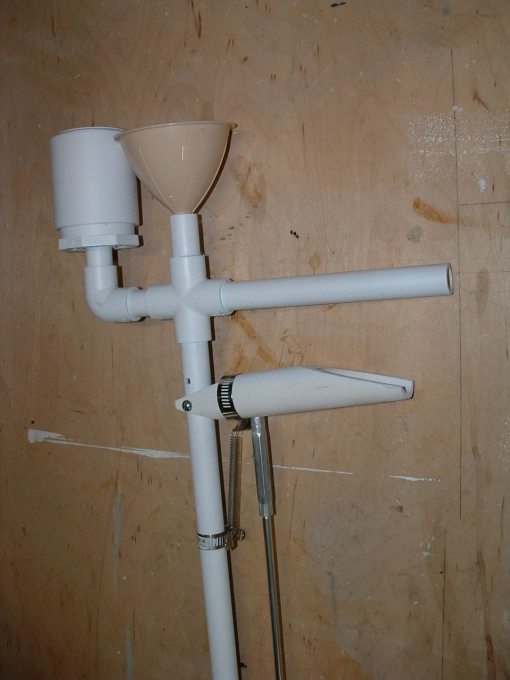
The Top End
The funnel is to guide a dropped a seed into the pipe, and next to it is a cup made out of a 2 inch PVC coupling sitting on a 2″ male x 1/2″ female PVC bushing. A 4 oz Yoplait yogurt container fits perfectly into the cup, closing off the hole in its bottom and holding the seeds. The cup is only to hold the seeds. There is no automatic drop of the seeds. Sorry, I’m just not that clever. You have to hold seeds in your fingers and drop them one at a time into the funnel. You drop a seed, then squeeze the handle to open the flipper and release the seed in the soil.
Edit 9\1\16: I’ve long since lost the yogurt cup and I’ve cut the 2 inch coupling down to about half height to make it easier to get my fingers in to grab the seeds. I closed the hole in the bottom of the coupling with good old duct tape. Also, the funnel is totally optional. It works just fine to drop the seeds into the top of the down pipe without the funnel there.
The handle is made of two parts. The lower piece is attached to the top of the pull rod and to a spring, so that squeezing it upward pulls the flipper open and drops a seed. When it’s released, the spring pulls it back down, closing the flipper. This piece is made of 1 inch PVC so as to be big enough to wrap around the 1/2 inch downpipe. The ends of this were angled in the table saw in the same way as the bottom of the downpipe.

Parts Layout
The individual pieces are shown above, and all together below.

Done
Edit 9/1/16: The worst part of this design is that I ran two screws all the way through the down pipe to pivot the flipper and the lower handle. It works fine for medium seeds, but big seeds can get caught on the screws. A better way to do it would be to run a short screw threaded into the plastic pipe from each side just enough to screw into the plastic, but not protrude inside. The downside to this is that the plastic pipe is not really very thick and i think it would be easy to strip the threads in the plastic. That’s why I didn’t do it that way.
If I were going to build it now, I think I would glue an extra thickness of plastic on the outside where the screws go and then use the short screws as mentioned above. This will change dimensions of the flipper and the lower handle. Smarter people may have smarter ideas.
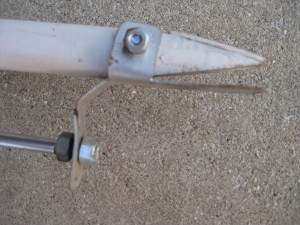
Requested close ups of the flipper Sorry they’re blurry.
Here’s a crude sketch of the dimensions of the flipper to help answer a posted question. The 2 inch section is the top part that is bent to attach to the pull rod.

May 18, 2009 at 11:42 am
Way to go TMan. Let us know how it works. It sure looks like it ought to. It should also make seed planting a heck of a lot easier.
FlowerLady
May 18, 2009 at 4:30 pm
Very interesting. DH will be interested in this I know. I always need ways to make my work easier.
Can you devise an easy way to dig potatoes?
~janie
May 18, 2009 at 9:07 pm
Thanks for the comments, FlowerLady and Janie. I’ll keep you posted.
Janie, I’ll give that potato digger some thought. 🙂
May 19, 2009 at 2:52 pm
[…] A Homemade Seed Planter […]
May 19, 2009 at 7:55 pm
A very cool contraption, ThinMan!
My Father still enjoys gardening,but he gets dizzy when he bends over. This looks like a great project for him to try.
Thanks for sharing your clever plan!
Patti
May 20, 2009 at 9:19 am
Thanks, Patti. That would be great if your dad could use it.
June 23, 2009 at 3:18 am
Hej
regarding the potato planter, http://www.standnplant.com has a pretty simple solution that can be made similar to our seed planter.
October 16, 2009 at 10:59 pm
MacGyver has NOTHING on you, brother!
Thanks for sharing!
October 17, 2009 at 9:02 pm
Aw shucks, Adam, it wasn’t that much. 🙂
You’re welcome.
TM
November 21, 2009 at 8:36 am
If i want to plant small seed its possible to use your inovation tools?
Regrads
Ruli – Indonesian
November 21, 2009 at 10:18 am
It might be possible, but the bottom part would have to be made very carefully. In my planter there is a small gap which would let tiny seeds slip through before the flipper was opened. Another concern would be the planting depth. You would have to be careful not to let the planter go too deep for your small seeds. Also, very tiny seeds might stick to the plastic tubing and not drop all the way down.
Good luck to you if you decide to try it.
TM
November 27, 2009 at 3:59 am
Okhey i will make some experiment for that. By the way is any information from you in mechanization for strawbery seed planting?
Regrads
Ruli
November 27, 2009 at 1:45 pm
Nope, sorry. I don’t know a thing about planting strawberry seeds
TM
November 29, 2009 at 1:07 am
Okhey thanks for your help..
Regrads
April 15, 2010 at 4:06 am
i built one made of gi pipe (based on your plan). works great. one thing that interest me is how do those wooden old corn planter work. how does the mechanism, i know is simple, work? do you have any idea? been looking for a drawing.
April 15, 2010 at 7:24 am
Jose – That’s great that you were able to build one and that it works. Good job! Although I don’t know what gi pipe is, I’m glad it worked for you.
Sorry, but I don’t really know how those old corn planters worked. I think they had two handles at the top, but I can’t remember any more than that.
Thanks a lot for your reply. I’m happy that my idea was useful.
July 28, 2010 at 11:30 pm
hello thinmac:
your pvc planter, was a great idea, we have just bought a piece of lot here in cebu (central island of the philippines) and im going to plant some sweet corn seeds. i was looking for some ideas to use a manual seed planter. im sure this will work, can you email me the tip portion of your planter?
thanks a lot
filipino okie
July 29, 2010 at 1:31 pm
Sorry, but I don’t understand what you would like me to put in an email. Can you clarify?
October 1, 2010 at 10:35 am
Love your seed planter and I would like to link to it in one of my articles.
October 1, 2010 at 7:14 pm
Sharon, feel free to link. Thanks for asking.
TM
October 5, 2010 at 7:16 pm
thinmac,
Hey thanks! Can’t wait to use it.
It’s heck-of-va better than the planting stick and seed bag I’ve been using.
October 5, 2010 at 7:53 pm
Yep, Joe, I think it will definitely beat that. Good luck with yours!
TM
October 7, 2010 at 2:57 pm
hi.thank you for this work.i am from azarbacan(khoy)and is nssesery for me to made this machine please guide me and explain to made it.thanku
October 7, 2010 at 3:27 pm
please guide me with email
esichavoshi@gmail.com
October 8, 2010 at 12:43 pm
Esi Chavoh – I have done my best to explain how to make this planter. If you have a question about any part of the explanation, please post it here and I’ll be happy to try to help you.
TM
October 25, 2010 at 3:03 pm
i want to know that how the seeds feeds to system and sit in hole soil .in our local seeds are nut.first we irrigate the field and later that moisture arrives to special moisture with cane grave the soil and the seeds sit in hole by man.we do this works for about tow hectare in one day by 6 person
October 25, 2010 at 3:09 pm
very thankyou for helo
October 25, 2010 at 7:40 pm
Esi – I hope I understand your question. Here are the steps to follow.
1. Drop a seed in the open tan-colored funnel at the top of the planter.
2. The seed will fall all the way down to the bottom of the tube.
3. Push the bottom of the planter into the soil.
4. Squeeze the handle. The flap on the bottom will open and the seed will fall into the soil.
5. Raise the planter up and soil should fall into the whole and cover the seed.
If this doesn’t help answer your question, please write back.
October 27, 2010 at 12:42 pm
thank for help do seeds fall in the whole automatically or no?if there is more picture please send me
October 27, 2010 at 7:55 pm
You have to drop the seed in the top hole with your fingers, one at a time.
After this, the seed will fall in the hole in the soil when you squeeze the lever.
December 25, 2010 at 1:28 am
This may not work in heavy clay soil. I divised one from a simple 3 1/2 foot section of 1/2 inch conduit. Strapped to the bottom and to the side is a 3 inch section of conduit with a hard wood dibble jammed into it. Poke a hole, spin (so the clay won’t stick) drop the seed down the tube and then drop a pinch of compost to cover the seed. It beats crawling on the knees and is faster too.
January 31, 2011 at 12:32 pm
Nifty machine you put together.
What is the hole above the lever pin for?
How is the seed cup sealed as you have the pvc cross connected to hold the cup and it appears to be open into the pvc handle?
Thank you…
February 1, 2011 at 10:39 am
Hi, rws, thanks for your nice comment. The hole above the lever pin was a mistake. It was supposed to be for the lever pin, but it was off a bit after I drilled it, so I just moved down a bit and drilled a better one. To seal the seed cup I have a 4 ounce Yoplait yogurt container that fits perfectly. I don’t remember where I got a 4 ounce cup. They are usually 6 ounces.
February 13, 2011 at 3:31 am
Hello,
Great homemade seed planter. I have a question about the steel rod you used. Is that an item that can be bought at a hardware store? Also, is that a turn buckle you use at the top of the rod?
Thanks,
Amy
February 13, 2011 at 9:55 am
Hi Amy, I’m glad you liked my seed planter. The rod is a 1/4 inch steel rod that you can usually find in hardware stores. One kind is threaded rod that has threads running its entire length or unthreaded. I bought the unthreaded kind and used a die to make threads on both ends. Not everyone will have the threading die, so threaded rod would be a good way to go.
You are right about the turnbuckle at the top of the rod. It makes an easy way to adjust the length of the rod so you don’t have to get it exactly right when you saw it to length.
Great questions. I should have covered them in the text, but didn’t think of it. If I get ambitious, I will fix that.
September 11, 2011 at 5:46 pm
plant potatos in old tires use one tire fill with dirt as they grow ad tire and more dirt when ready take tires down nock down dirt pick up potatos no digging
September 12, 2011 at 4:03 pm
Crikey, William, how many old tires do you have at your place?
September 13, 2011 at 11:57 am
interesting gadget you have there thinmac. Just wondering how do you control the amount of seed to drop per hole? Do you have to drop into the downpipe one seed at a time or you just let the seeds fill the downpipe and the flap controls the amount of seed per hole?
September 14, 2011 at 9:51 am
Maxx – You have to drop the seeds down the pipe one at a time by hand. Anything more sophisticated was beyond me.
September 14, 2011 at 11:37 am
Hi thinmac I’m a student at Iowa State University working on a sophmore design project in mechanical engineering. My group decided to build a seed planter similar to yours, and we had a few questions.
-What is the force required to operate the seed planter
-What is the time required to plant 30 seeds
-What was the cost to build the seed planter
-How long did it take you to assemble it
-How reliable is the seed planter
Thanks
September 14, 2011 at 12:04 pm
Hi Spencer. I like your choice of project, and I’ll answer your questions as best I can.
-What is the force required to operate the seed planter?
That would depend on where along the lever you decide to apply the force. I don’t have an accurate spring scale to measure it so I can’t help you with that. For the spring that I used I would guess that in the middle of the lever the force is on the order of one or two pounds. Obviously the choice of spring is going to affect it.
-What is the time required to plant 30 seeds?
Probably two to three minutes
-What was the cost to build the seed planter?
This is probably something engineering students like you guys could determine. In my case, at least half of the materials were things I already had on hand, so my cost wouldn’t be representative of many people’s.
-How long did it take you to assemble it?
Maybe 2 to 4 hours of construction time.
-How reliable is the seed planter?
It hasn’t broken yet. In wet soil it has a tendency to plug up with soil and not let seeds out, even though the operator keeps squeezing the lever. I’ve learned not to use it on wet days.
Good luck with your project. I’d love to see a picture of it when it’s done.
TM
October 1, 2011 at 8:37 pm
[…] A Homemade Seed Planter « ThinMan’s Blog […]
October 12, 2011 at 7:14 pm
This is awesome. Thanks for sharing this. I’ll make one of these over the winter.
October 12, 2011 at 8:21 pm
Fritz — glad you liked it, and good luck with yours.
November 19, 2011 at 7:59 am
it is really a good creativity.and best solution for row planting.
How can I find this seed planter? please tell me…
November 19, 2011 at 10:31 am
Yohannes – you can’t find this seed planter anywhere. You have to make it yourself.
February 1, 2012 at 7:37 pm
Excellent work Senor T-
How’s the PVC glued piece holding up? It appears you did not use the cleaner/primer (usually purple) before cement.
What type of soil do you have?
Thanks for sharing. We’d like to make two similar to this to facilitate even faster planting.
February 2, 2012 at 8:16 pm
Hi, Grower X, the piece is still attached, in spite of not using the purple primer stuff. That may be partly because I haven’t used it too much. I tend to use it only for the bigger flatter seeds that won’t do well in my Earthway seeder, like squash and pumpkins.
My soil here is fairly sandy with a fair number of rocks. The planter works well in it as long as it isn’t wet.
Good luck with yours.
March 21, 2012 at 1:15 pm
please can you explane how the tip is open maybe some close up picture please
March 31, 2012 at 1:55 pm
Dragan, I’m sorry it has taken so long to reply to you, but I am posting two photos that show the flipper on the tip of the planter. When the handle is squeezed, the steel rod moves the flipper open. When the handle is released, a spring closes the flipper back up. I hope this helps you understand it.
April 9, 2012 at 1:19 am
Can u make a video about it pleaze
April 9, 2012 at 1:20 am
Do u think u could make a video about it please
April 11, 2012 at 10:05 pm
Peohguy Says: Very clever thinmac. It really looks like it should work well as long as the soil isn’t too damp and cause the flapper end to clog with soil, but your flapper should do a good job of preventing it. A 1/2″ to 1″ long section of thin walled 1 1/2″ to 2″ Dia PVC pipe closed off on both ends with a hole slightly larger than a corn or bean seed in one place on the curved surface of the, say 2″ dia pipe section along with a hand crank centered in the enclosing end caps of the 2″ dia pipe section and extending through the sides of the seed funnel might make it more automatic. The idea being that the seed wheel mounted inside the your seed funnel would be set deep enough so it would be covered by the seeds. Turning the crank would alow a single seed to drop in the hole when the hole is on the top of the rotation and then the seed would drop out of the hole when the hole is at the bottom of its rotatation, then dropping into the seed deposit tube. It may work with some experimentation and refinement.
April 17, 2012 at 10:57 pm
Trevor – sorry, but I won’t be building another one, so there won’t be a video of the construction.
April 26, 2012 at 1:51 pm
Peohguy – I had to think about that for a while, and then I took a little vacation. Your idea sounds pretty clever to me and I may try to implement it some day when I feel ambitious. Thanks for taking the time to tell me about it.
July 26, 2012 at 5:23 am
Hi Thinmac, i leave in Africa and agriculture is our life yet mechanizing it is very expensive. i think i will build this and see it can work for me and also try to integrate it with Dennis Schwab’s additions and see it can be automatic. will be back to you in a months time when i have built it. Thanks in advance.
July 26, 2012 at 8:52 am
Hi, Brino Omuyiizi Ddungu Hosey. I’d be very happy if my seeder idea could help you make one for yourself. So far, I haven’t heard from anyone else who has built one, and I would enjoy seeing yours when you get it built. Good luck with the modifications.
August 24, 2012 at 6:26 am
I just ran across this. Very clever
August 25, 2012 at 1:50 pm
Thanks for your kind comment, Leigh.
December 24, 2012 at 8:12 pm
Sweet!
December 24, 2012 at 9:18 pm
I guess I just dont understand ,. i get it that the beige funnell is where you drop the seed, but what is the white funnell that comes off the cross-tee opposite the handle?
December 25, 2012 at 9:39 pm
Chris – The part you’re asking about is where I put a yogurt container to hold the seeds. I reach into it and pull out seeds so I can drop them one by one down the funnel. It doesn’t work really well because it’s too narrow and deep to easily grasp the seeds. I would cut it down to about half the height shown in the pictures.
May 15, 2013 at 3:29 pm
This is a fantastic idea. It can be helpful millions of small holder ‘tef’ growing farmers in Ethiopia. Please visit http://www.ata.gov.et and contact them.
Girma
May 18, 2013 at 7:04 pm
[…] A Homemade Seed Planter | A Geezer’s Ramblings […]
May 18, 2013 at 9:33 pm
[…] A Homemade Seed Planter | A Geezer’s Ramblings […]
May 19, 2013 at 12:34 am
[…] A Homemade Seed Planter | A Geezer’s Ramblings […]
May 19, 2013 at 6:42 am
[…] planting gun anyone? [green_message]Source: https://thinmac.wordpress.com/a-homemade-seed-planter/ [/green_message] Follow me on Facebook at […]
August 28, 2013 at 11:01 am
Please help me with the drawings of a well labelled seed planter parts.
August 28, 2013 at 11:55 am
I’m sorry, Sayf ameen, but I don’t have any drawings of these parts.
September 3, 2013 at 6:44 am
That is brilliant!!! I live in Luxor with my Egyptian farmer husband who is only learning of these new, labour saving devices!!! 🙂 He grows corn twice a year, as we can get four growing seasons out of one year. Most small farmers cannot afford big machines so everything is done by hand. He is going to make your seed gun and see how it goes. Thank you so much. Its a great job. Far too wellmade to be ‘cobbled’ together!
September 3, 2013 at 10:14 am
How nice that he can use my idea. The one thing I would change is to not use bolts that go all the way through the down-pipe, as bigger seeds can get caught on them. I would try two short screws, one on each side in place of each bolt. I have also cut down the seed cup on mine to make it easier to pull the seeds out. Good luck.
April 5, 2015 at 12:02 am
I really like your idea! Can you advise the exact dimensions of the metal cross piece that you bend to form the flipper?
April 9, 2015 at 5:31 pm
Sorry for the delay getting back to you, Quizcat. I usually do better than this. I made a pretty crude sketch of the piece and dimensions and I’ll add it to the post.
April 9, 2015 at 6:40 pm
Thank you very much! Im going to give it a try…
April 9, 2015 at 8:42 pm
You’re very welcome. Good luck with yours.
September 4, 2015 at 4:15 pm
I just ran into this and am thinking the next gadget to be fashioned out of scrap has got to be at planter – just like this seeder but with a larger caliber downpipe for seedlings. Thanks for the inspiration! 🙂
September 4, 2015 at 5:25 pm
Sounds good to me. Send pics when you get it done! 🙂
January 19, 2016 at 7:58 pm
Supper i like this can have this videos of while building videos
January 19, 2016 at 9:40 pm
Sorry, I have no videos.
August 21, 2016 at 12:41 pm
Your attempt has provoked me into thoughts that will make my planting exercise easier. Thank you and well done.
August 21, 2016 at 1:33 pm
I’m glad you found it useful. Thank you for taking the time to write.
August 29, 2016 at 4:08 am
I am trying to construct similar device for rice seeds.
I have a question. When you flip it open. Doesn’t the seed rush out in bulk?
August 29, 2016 at 7:27 am
When I use the seeder I drop only one seed at a time down the tube. I don’t try to use it for very small seeds.
September 1, 2016 at 12:06 pm
Nice planter, we plant garlic standing up clove. I think I will try to adapt it to garlic. Do you have any ideas?
September 1, 2016 at 12:17 pm
I haven’t planted garlic, but I think the cloves would work well, except for one thing. The worst part of my design is the two screws that go through the down tube. Large seeds sometimes get caught on those screws and I imagine that garlic cloves would also get caught. If you could use a short screw from each side instead of a long screw that goes through the tube, I think it would work for you. Good luck.
October 16, 2016 at 3:53 am
Love your gadget. I did not have the time to make one just now so I ended up buying a planting stick from Stand N Plant which you mentioned earlier ( http://www.standnplant.com).
One thing I found with the Stand N Plant which is probably relevant for your device is how I use it with very small seeds. With very small seeds, as you know, there is always the chance that the seed will fall through a gap in the “flipper” (Stand N Plant don’t call it that but it does the same job) before the stick is pushed into the ground. For tiny seeds I simply put the stick on the ground before dropping in the seed, then proceed from there.
With a bit of practise I can even allow for the 1/2 second or so it takes the seed to fall to the length of the planting stick and get a rhythm going where I can plant a seed every few steps.
For bigger seeds I like to put the seed in before the stick is on the ground because the “clunk” or “click” sound of the seed hitting the bottom of the pipe of the planting stick usually confirms to me that it has not got clogged with mud or the like. I suspect that any such device will have problems when the ground is muddy.
Thanks for your great idea as I may try and make one when I have the time, just for the fun of it.
October 16, 2016 at 11:04 am
Hi, William. You definitely speak from experience, and I appreciate your helpful comments. It sounds like the Stand’n’Plant is really all you need — it does everything my planter does and maybe even a little better. Thanks for contributing.
February 9, 2017 at 4:00 am
this is amazing ,but I want seeding automatically will u plz send me an idea.
February 9, 2017 at 9:03 am
Yes, that would be a very nice feature, but I don’t know how to do that.
May 8, 2018 at 5:48 am
Awesome works, I was manually planting this year using my fingers bending over. The whole time I was envisioning something very much like this… 🙂 I thought of a great mod for your design, think magazine like for a firearm…. So what you do is get some pvc and saw slits in enough of the side all down the tube every 1/2 inch so you can insert a piece of poster board/thin plastic that would separate the seeds for each hole then you could pull each separator out its slot in the magazine and it would drop your seeds down your device. You might even be able to go further with that idea by thinking of how a caulk gun works by inching each squeeze further to have it jerk each divider in a similar manner. so two you could maybe run it along your primary tube with the planter head and have it drop in that way or make the primary tube the loadable magazine itself or even combine 4 together an switch as you run each tube out of the seeds. They some clear plastic tube that might also function to make loading the tubes with seeds easier, Maybe have it in a spaced configuration so you could plant 4 holes at a time or something even. So 4 angles magazines feeding 4 planter heads like you made. That would be sweet… 🙂 I like the magazine idea over the turning gear types that attempt to grab the seeds from a gravity hopper because you can put multiple seed types/sizes to double plant two different things in single hole. The other idea I figured could work was a quarter gumball machines style, but figured it would be problematic for goofy shaped non uniform seeds.
May 8, 2018 at 9:02 am
That’s a really clever idea, Brian. The big question is whether I will ever get ambitious enough to try to make the seed magazIne. Thanks a lot for the idea. If you ever build one, shoot me a message so I can see a picture.
October 4, 2018 at 2:55 pm
Hello,nice share.
October 4, 2018 at 6:22 pm
Thanks. I appreciate the thought.
June 20, 2023 at 4:27 am
The flipper to release a seed remains a problem can one leave out.
June 26, 2023 at 5:12 pm
[…] ‘Thin Man’ of Michigan made his seeder using PVC pipe plus the following items—a funnel, a squeeze handle, a pull-rod, and a steel flipper. Once a seed is dropped into the funnel and falls to bottom of the pipe, which has been inserted into the soil, he squeezes the handle, which pulls the rod upward to open the flipper and release the seed. (Source: Complete instructions, including pictures, at https://thinmac.wordpress.com/a-homemade-seed-planter.) […]
October 13, 2023 at 6:20 pm
It helps a lot if you’re planting in wet soil. The pipe can clog up otherwise.